
Z-Butt
Z-Butt is one of my passion projects. That being said, I really do hope that all that use it find it to be an easier way to make two piece molds for their artisan keycaps. When I set out to design this, I wanted to explore a more cost effective solution that did not require milled aluminum or expensive 3rd party services.
Reddit: Imyownyear
Special thanks to Fiscal_rascal, Cardiactuna, Davness<?>, CorruptedCaps, and morrae for helping with testing, providing resources, and feedback.
The different Parts
-
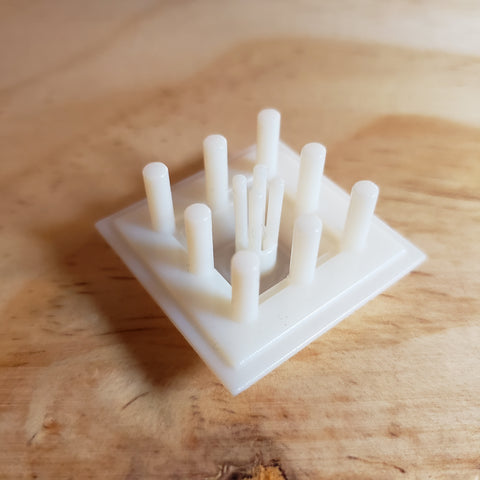
Stem Cavity: The stem cavity is what gives your keycap butts shape, it is also what gives it structure since it is what shapes the stem. You would use this part to form one of the top most mold piece.
-
Sculpting Base: Can be used to sculpt artisan keycaps out of your preferred medium (I use Hard modeling clay).This would be used (along with your sculpt) to produce the bottom mold.

-
Master Base: Can be used to sit your master on. This would be used (along with the keycap you choose to place on it) to produce the bottom mold in a two piece mold.

How to use Z-butt
Purchase/print Z-Butt: You can either choose to purchase the Z-butt system from me here, or use your own printing service.
Obtain Z-Butt files:
Purchase other supplies (Note All are affiliate links to Amazon, any bit helps! Do not click if you are opposed to using affiliate links, just look them up):
- Note: Use this list as a guide when purchasing. You do not need all of these supplies to start sculpting and making keycaps, this is just the list of materials to cover sculpting-bubble free casting. Anything with an * is the bare bones of what you will need to make a keycap.
- Silicone*: I strongly recommend the use of Mold Star 30 by Smooth On, but i have used Mold Star 20T (great for prototyping since it cures in 30min) and Oomoo 30 with great success in the past.
- Lego Blocks: If you did not print the No Hassle containers, you will need Lego blocks. I would recommend a cheap no brand 1000pc lego set.
- Resin*: This is for when you are ready to start making keycaps. I would recommend Smooth Cast 300 for White, Black, Grays or Pastel colors. Smooth cast 325 for every other color. Also have used Aluminite Water Clear resin for when I need more work time, and Art'n Glow resin for even longer work times (Though the cure time is 24hrs).
- Casting misc: As far as casting tools goes, you'll probably need dyes to change the color of the resin, I use Aluminite dyes, since they come in dropper bottles, but some might prefer Smooth On's selection. Also to consider are mixing cups and stirring sticks. I like to use graduated cups, and craft sticks to stir.
- Sculpting materials: For when you will make the keycaps. I would recommend Hard Sulfur free modeling clay like Chavant NSP Hard. I have also used Self hardening epoxy clay like Apoxie, but it is a bit tricky to get working. You can also you polymer clay, like Sculpey, but you wont be able to bake it in the oven unless you print the sculpting bases in a thermo-resistant plastic. You will also need tools for sculpting. I would recommend to get some metal sculpting tools and some silicone based sculpting tools.
- Pressure pot & Air Compressor: You only need a pressure pot and air compressor if you want your casts to be bubble free. I would recommend a TCP Global 2.5 pot and a California Air Tools 8010. You also need an air hose to connect the pressure pot to the air compressor. Note: The pressure pot needs to be converted to be used for casting resin. There are many great tutorials out there but Casey does a great job explaining it in his Youtube video.
- You'll want to have either your sculpt done on the sculpting base, or your Master-base with the keycap you want to make a mold of ready.

- Now you'll want to get a Lego base and some lego briks and build a wall around them. For the stem cavity, you'll only need to do it 2 Lego blocks high and for the sculpt keep it at 3 minimum. Z-butt in the 1U size was designed to fit perfectly within a 4x4 lego pip space.

- Mix your desired silicone, in this case I used Mold Star 30, but I have since been using 20T with faster results. Remember to prefill your stems using a toothpick before pouring all the silicone over it. This is essential to getting that perfect stem and removing any bubbles. After doing that, pour the Stem-Cavity side being careful not to overfill it past the sprues as you need the sprues sticking out. Pour the keycap side now and cover it completely.

- Place in the pot and wait until the silicone is cured. (read the instructions on your selection of silicone)
- Once its fully cured, you can take it out of the mold and carefully remove the Lego blocks around it. Clean up excess flashing and carefully separate the silicone from the Stem Cavity. I usually turn it clockwise lifting little by little.

- Once you separate the silicone from the respective Z-butt pieces, now its time to cleanup flashing and test fitment. They should sit snug on-top of each other like so:

- Casting.. Coming soon!


